In this video/blog post we’ll look at how to install Plex on OpenMediaVault 5 using Docker and Portainer. We’ll also include the noexec fix while we’re at it to make sure that everything works without issue.
We’re going into this with the understanding that you’ve already setup OpenMediaVault 5 on a device. If you haven’t, go check out my other tutorials on how to do that and come back to this tutorial.
Getting Started
First thing, make sure you have your system up to date with all the latest updates.
Next, head over to omv-extras.org and click on the link for OMV version 5. Then look for the link called “openmediavault-omvextrasorg” and click it. Click the newest version. In my case, it is “5.2.1”. Then click the “Files” tab at the top of the page. Then click “pool”, “main”, and “o”. Next click “openmediavault-omvextrasorg”. On this page, you should see a couple of options. Click the file that ends in “.deb” to download the file.
Go back to your OpenMediaVault installation and click on “Plugins” and then click the “Upload” button on that page. Upload the .deb file you just downloaded. Once that is complete, search for “extras” in the search field at the top of the page.
Check the box next to “openmediavault-omvextrasorg 5.2.1” and click the “Install” button at the top of the page.
Now reboot the system.
Once the system has rebooted, you can log back in. Click the new “OMV-Extras” link in the left sidebar. Click on “Docker” in the blue bar. Then click the dropdown that says “Docker” and click “Install”. Once that has completed, click the “Portainer” dropdown and click “Install”.
Fixing noexec
Now open an SSH program like Putty and login to your server using root.
Type:
nano /etc/openmediavault/config.xml
Then do a search for “mntent”
You should be brought to a section that is a different color because it is commented out. Use your arrow keys to press down until you get to the next section and look for the “<opts>” line and remove the “noexec” option from that line. Then press CTRL+X and then press Y to confirm.
That will bring you back to the main screen of your Putty program. While you’re there, type this:
omv-salt deploy run fstab
Press Enter on your keyboard. It will look like nothing happened and that’s fine. Now type in:
reboot
And then press Enter on your keyboard.
Once the system has rebooted, you can log in to the server via Putty again using root and type in:
cat /proc/mounts
Then look for your hard drives (sda1 or sdb1) and make sure there is no “noexec” in any of the lines associated with your hard drives.
Create Shares
You’ll need to go your OpenMediaVault user interface and click “Shared Folders”
Create each of the following:
- Config
- Movies
- TV
- Music
The “Config” folder is the only required folder. You can adjust your media folder names to fit your needs, but these are the defaults.
Make sure the permissions for each of the folders is set to “Everyone: read/write”.
Hover over any of the header titles (Name, Device, Relative Path, etc) and click the dropdown arrow. Then hover over “Columns” and check the box that says “Absolute Path” as we’ll need that later.
Then go to “SMB/CIFS”. Make sure this is set to “Enable” and then go to “Shares” in the blue bar.
Click “Add” for add each of the folders you created a moment ago and make sure the “Public” setting is set to “Only guests”.
Click “Save” after each one and once you have all your folders saved, you can click the “Apply” button in the yellow bar at the top of the page.
Post Continues After This Ad Break:
Ad Break

Donations help me keep the channel running
Post Continues Here:
Install Plex
Now go back to your OpenMediaVault server and login to the user interface.
Click on “OMV-Extras” and then click “Docker” in the blue bar. Then click the “Portainer” dropdown and click “Open web”.
Tell it that you want to control a local server. Then click on the section that says local.
Click “Containers”. Then click “Add container”
In a separate browser window, open this link: https://hub.docker.com/r/linuxserver/plex
In the “Create Container” window, fill in each of the fields based on the “docker-compose” information in the linuxserver/plex page.
You’ll need to open Putty again to get your UID and GID.
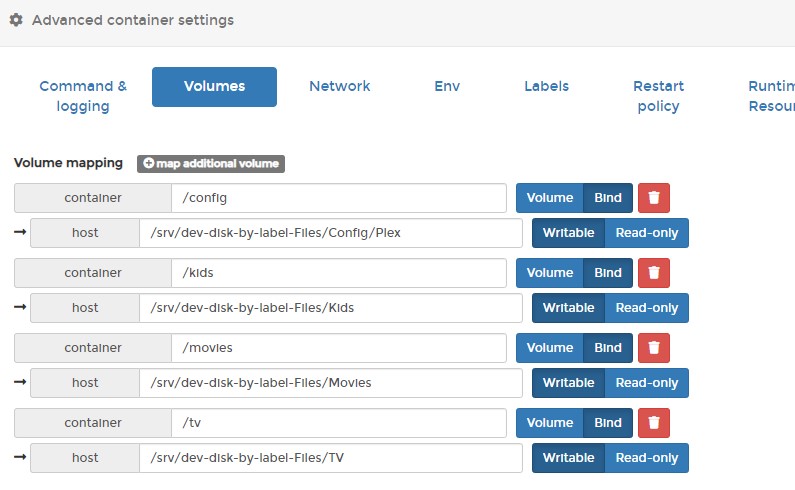
Under “Volumes” click “map additional volume” 1 time for each of the folders you created. Click the blue “bind” button for each one as well.
For the “Config” folder, you’ll type:
/config
in the “container” field. Then you’ll type the absolute path of that from the “Shared Folders” page on your OpenMediaVault page and append it with /Plex. Mine looks like this with all the folders added:
Next, click the “Network” tab and change the setting from “Bridged” to “Host”.
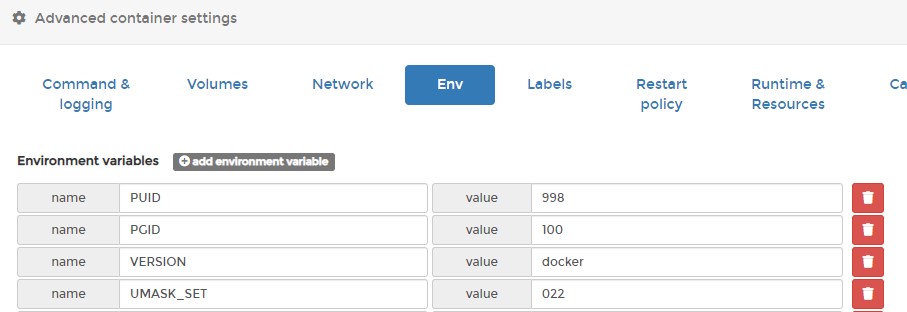
You’ll move to the “Env” tab next and enter the PUID, PGID, VERSION, and UMASK_SET options. Mine looks like this:
Next, go to the “Restart policy” tab and change it to “Unless stopped”.
That’s it. Now you can click the “Deploy the container” button right above the “Advanced container settings”
Once it has completed, you can go to http://your-server-ip:32400/web/index.html
Sign Into Plex
Now you will be asked to sign into Plex and claim your server. Do that.
Next you will add your media folders and give each a name for Plex. Once you have done that, you can add users and assign permissions for each user to be able to access whatever folders you want them to be able to access and then you’re done.
/=========================================/
Here’s my Amazon Influencer Shop Link:
Amazon: https://dbte.ch/amazonshop
/=========================================/
Like what I do? Want to be generous and help support my channel? Here are some ways to support:
Patreon: https://dbte.ch/patreon
Ko-fi: https://dbte.ch/kofi
/=========================================/
Remember to leave a like on this video and subscribe if you want to see more!
/=========================================/
Follow Me:
Twitter: https://dbte.ch/tw
Facebook: https://dbte.ch/fb
Subscribe: https://dbte.ch/ytsub