In this post we’ll look at how to install Chevereto on your Docker setup!
An image hosting script that allows you to get your own image hosting website. It’s your hosting and your rules, say goodbye to the closures and restrictions.
First thing, you’ll need to go to Portainer and copy this to a new stack:
https://gist.github.com/dnburgess/18b2b90ba73aedbb434e521388a1390a
You can map the volumes to wherever you’d like to store them on your system.
NOTE: Be sure to change the passwords to something other than what is shown here for security reasons.
Additional Chevereto Modifications
The php.ini file will need to be created by you if you don’t already have one available for use. By default, you won’t be able to upload images more than 2mb and this will fix that.
Here is the contents of my php.ini file for this setup:
upload_max_filesize = 20M
post_max_size = 20M
memory_limit = 2048M
max_execution_time = 180
Be sure to set the memory limit to something your system can handle. For instance, if your server has 4GB of RAM, don’t set it to 4096M.
You’ll also need to make sure you set the correct permissions to the chevereto_images folder. To do that, and using my setup as an example, you would use the following command:
sudo chmod -R a+rwx /srv/dev-disk-by-label-ssd/conf/Chevereto/chevereto_images
Be sure to change the path to wherever you setup your images to be stored on your server.
Once you have that done, you can go to http://your-server-address:8686
Fill in the fields to setup your admin account and the email address fields, choose whether you’d like this to be a community site or a personal site, and then click “Install Chevereto”.
The next screen should say “Installation complete” and there should be a link to go to your admin dashboard.
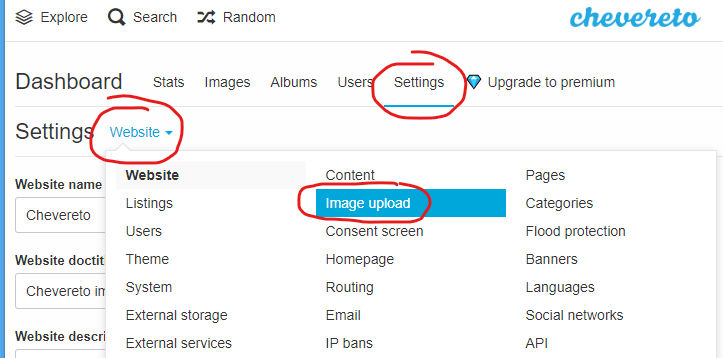
Click that link and then login. You’ll be taken to the dashboard. Before doing anything else, click Settings, Website, then Image upload to change the maximum image upload size:

Scroll down a bit and change the values to something reasonable that doesn’t exceed the values in your php.ini file:

Once you’ve got that done, you can go ahead and change any of the other settings you’d like to in the admin settings page to get the site setup for your use case.
OpenMediaVault Tutorials
If you’re interested in other tutorials for your home server, check here: https://dbtechreviews.com/category/openmediavault/
/=========================================/
Like what I do? Want to be generous and help support my channel?
Here are some ways to support:
Patreon: https://dbte.ch/patreon
Ko-fi: https://dbte.ch/kofi
/=========================================/
Remember to leave a like on this video and subscribe if you want to see more!
/=========================================/
Follow Me:
Twitter: https://dbte.ch/tw
Facebook: https://dbte.ch/fb
Subscribe: https://dbte.ch/ytsub

