Hey there! Thank you for joining me for the third installment of our Proxmox series. If this is your first time here, make sure to check out the first two videos to catch up on our progress. We’ve successfully installed Proxmox and set up an Approxmox container template in our previous sessions, and today we’re diving into something quite exciting – setting up a Software Defined Network (SDN).
SDN is a somewhat fresh addition to the array of features offered by Proxmox, but what’s the real fuss about it? Let’s explore the basics of SDN in Proxmox, why it may (or may not) be useful for your setup, and how to get it up and running.
Getting Started with SDN in Proxmox
For those unfamiliar, a Software Defined Network (SDN) in Proxmox is primarily about enhancing how network functionalities are managed and operated. In essence, it provides a layer of management over your physical network that allows for easier deployment of virtual networks (vnets) and configurations.
Why SDN?
The immediate question that comes to mind is why SDN?
“In this video, I mentioned that aside from a few quirky projects, I don’t see a significant personal utility for using SDNs. However, SDNs can vastly simplify complex networking setups and facilitate advanced requirements like multi-tenancy configurations.”
Preparing Your Proxmox for SDN
Before diving into the SDN setup, ensure your system meets the prerequisites. If you’re running Proxmox 8.1 or newer, the initial steps are somewhat trimmed down thanks to integrated support. For those on older versions, a few more steps are necessary.
Initial Steps
DHCP IPAM
The DHCP integration into the built-in PVE IP Address Management stack currently uses dnsmasq for giving out DHCP leases. This is currently opt-in.
To use that feature you need to install the dnsmasq package on every node:
apt update
apt install dnsmasq
# disable default instance
systemctl disable --now dnsmasqTip:Always check the documentation linked in the description for the most up-to-date guidance and troubleshooting tips.
FRRouting
The Proxmox VE SDN stack uses the FRRouting project for advanced setups. This is currently opt-in.
To use the SDN routing integration you need to install the frr-pythontools package on all nodes:
apt update
apt install frr-pythontools
Creating the SDN
Now, let’s get into the crux of the setup.
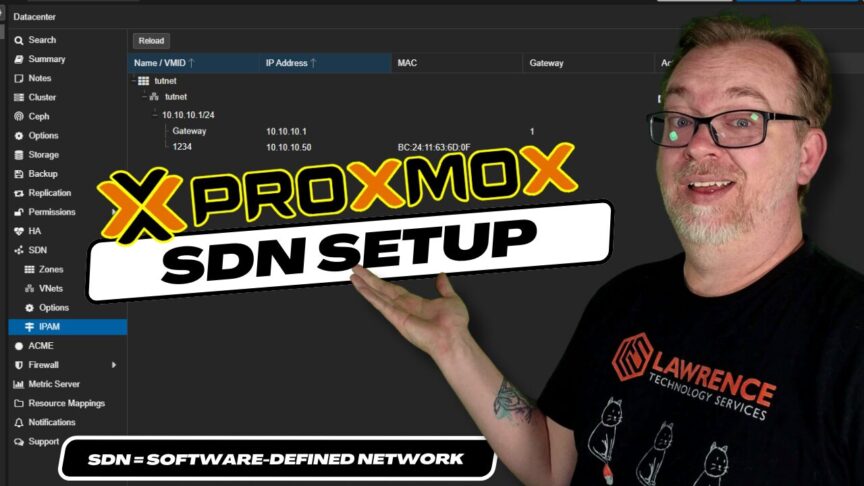
Step 1: Access SDN Configurations
Navigate to the ‘SDN’ options in your Proxmox dashboard. Here’s where you’ll spend most of your setup time.
Step 2: Configure Zones
Zones are the first step towards structuring your SDN. Think of a zone as a container for all your network segments.
- Click on
Addto create a new zone. - Use a simple setup for a start – this tutorial assumes a straightforward configuration.
- Name:
TutNet - MTU and Nodes: Defaults are fine for basic setups.
- IPAM: Set to
pve(Proxmox’s default IP address management tool).
- Name:
Ensure that Automatic DHCP is enabled by checking the ‘Advanced’ box. This setup is crucial for hassle-free IP management across your SDN.
Step 3: Define Virtual Networks (Vnets)
After setting up a zone, creating Vnets is your next step. Vnets are virtual representations of your physical network layout.
- Navigate to the Vnets tab and click
Create. - Here, details depend on your specific use case. For demonstration:
- Name:
TutNetVnet
- Name:
Link this Vnet to the zone you created earlier by selecting it in the zone box.
Step 4: Add Subnets
Every Vnet needs subnets – the final piece of our SDN puzzle.
- Choose your newly created Vnet and add a subnet.
- Specify an IP range that fits your network planning.
- Crucially, enable SNAT to allow containers to access the internet if necessary.
10.10.10.0/24 # Example subnetApplying Configurations and Rebooting
With all configurations in place, apply the settings and reboot your Proxmox server to ensure all changes take effect properly.
Post-Reboot: Ensuring Functionality
After rebooting, confirm the settings by checking the connectivity and functionality of your newly created SDN setups. You might want to attach a VM or container to the SDN and see if it communicates as configured.
Conclusion: Why Bother with SDN?
Understanding SDNs in a Proxmox environment opens doors to scalable, flexible, and manageable networking that standard setups could struggle to provide effortlessly. Whether it’s segmenting your network for security, handling multiple tenants, or just geeking out on neat network setups, SDNs have a place in the modern ProxMox toolkit.
So, what do you think about implementing SDN in your Proxmox environment? Any unique challenges or setups you’d like to share? Drop your thoughts and feedback below—or better yet, join the ongoing conversation on our social platforms.
Bonus Tip: Stay tuned as I explore configuring SDNs for stealthy in-network container deployments in an upcoming video! And for those who appreciate the direct support, consider subscribing and joining our community for exclusive content and discussions.
Remember, the effectiveness of an SDN relies heavily on specific needs and scenarios. It’s not a one-size-fits-all solution but an exciting option to expand your network management capabilities robustly and flexibly. Happy networking!
Proxmox SDN Docs: https://pve.proxmox.com/pve-docs/chapter-pvesdn.html