In this video/blog post we’ll look at How to Install and Setup Traefik with CloudFlare Using Your Own Domain Name.
For this to work, you’ll need to have a domain name purchased. You’ll also need a FREE CloudFlare account. You’ll need your domain’s DNS settings pointed to your CloudFlare account’s NameServers.
You’ll want to create an A record for your domain name and it should look like this:

Of course, you’ll need to change the IP address to the IP address your ISP gave you. If you don’t know it, go to Google and search for “what is my IP” and it will tell you. Put that in.
You’ll also need to create some subdomains. One subdomain for each service you want to have access to. For this tutorial, I’m going to setup a music server, a wiki server, and a dashboard, so I’ll need 3 subdomains. We’ll set those up as CNAME entries like this:

Once we have that done, we’ll go to our server.
Setting up Traefik
First, we need to login to our server as root.
In the home directory (the one you land in when you login) type:
mkdir traefik
Press enter and then type:
cd traefik
Then we’ll need to create 2 files. The first file will be called dynamic.yaml. Type this in your terminal window:
nano dynamic.yaml
The screen will go basically blank. Paste this in:
## Setting up the middleware for redirect to https ##
http:
  middlewares:
    redirect:
      redirectScheme:
        scheme: https
Press CTRL+O and then Enter. That will save the file. Then press CTRL+X to exit.
Then type nano docker-compose.yml. The screen will basically go blank. Paste this in:
version: "3.3"

services:
  traefik:
    image: traefik:v2.0
    restart: always
    container_name: traefik
    ports:
      - "80:80" # <== http
      - "8080:8080" # <== :8080 is where the dashboard runs on
      - "443:443" # <== https
    command:
      - --api.insecure=true # <== Enabling insecure api, NOT RECOMMENDED FOR PRODUCTION
      - --api.dashboard=true # <== Enabling the dashboard to view services, middlewares, routers, etc.
      - --api.debug=true # <== Enabling additional endpoints for debugging and profiling
      - --log.level=DEBUG # <== Setting the level of the logs from traefik
      - --providers.docker=true # <== Enabling docker as the provider for traefik
      - --providers.docker.exposedbydefault=false # <== Don't expose every container to traefik
      - --providers.file.filename=/dynamic.yaml # <== Referring to a dynamic configuration file
      - --providers.docker.network=web # <== Operate on the docker network named web
      - --entrypoints.web.address=:80 # <== Defining an entrypoint for port :80 named web
      #- --entrypoints.web-secured.address=:443 # <== Defining an entrypoint for https on port :443 (not really needed)
      #- --certificatesresolvers.mytlschallenge.acme.tlschallenge=true # <== Enable TLS-ALPN-01 (not really needed)
      #- --certificatesresolvers.mytlschallenge.acme.email=you@youremail # <== Set your email (not really needed)
      #- --certificatesresolvers.mytlschallenge.acme.storage=/letsencrypt/acme.json # <== SSL stuff we don't need.
    volumes:
      #- ./letsencrypt:/letsencrypt # <== Volume for certs (TLS) (not really needed)
      - /var/run/docker.sock:/var/run/docker.sock # <== Volume for docker admin
      - ./dynamic.yaml:/dynamic.yaml # <== Volume for dynamic conf file, **ref: line 27
    networks:
      - web # <== Placing traefik on the network named web, to access containers on this network
    labels:
      - "traefik.enable=true" # <== Enable traefik on itself to view dashboard and assign subdomain to$
      - "traefik.http.routers.api.rule=Host(`monitor.yourdomain.com`)" # <== Setting the domain for the d$
      - "traefik.http.routers.api.service=api@internal" # <== Enabling the api to be a service to acce$

networks:
  web:
    external: true
Press CTRL+O and then Enter. That will save the file. Then press CTRL+X to exit.
Now we need to create a network called “web”. So type this:
docker network create web
Next, you’ll want to deploy the container we just created, so type:
docker-compose up -d
Press enter on your keyboard and wait for the container to finish setting up.
Now you can go to your browser and type in http://your-server-ip:8080 and view your new Traefik dashboard.
Also, you should be able to go http://monitor.yourdomain.com and see your Traefik dashboard.
Installing AirSonic
Next we’ll install an application container. Let’s start with Airsonic.
Go to your Portainer page and go to Stacks. Create a new stack and paste this in:
---
version: "2"
services:
  airsonic:
    image: linuxserver/airsonic
    labels:
      - traefik.enable=true
      - traefik.http.routers.airsonic.rule=Host(`music.yourdomain.com`)
      - traefik.http.routers.airsonic.entrypoints=web
    container_name: airsonic
    environment:
      - PUID=998
      - PGID=100
      - TZ=America/Denver
    volumes:
      - /srv/dev-disk-by-label-Files/Config/AirSonic:/config
      - /srv/dev-disk-by-label-Files/Music:/music
      - /srv/dev-disk-by-label-Files/Podcasts:/podcasts
    networks:
      - web
    restart: unless-stopped
Be sure to change the “volumes” to reflect YOUR server’s storage settings.
Click Deploy and wait for it to deploy. You should now be able to go to https://music.yourdomain.com and access your Airsonic server. If you can’t, be sure to check the container’s Network settings and make sure it’s on the “web” network.
Installing DokuWiki
Go to your Portainer page and go to Stacks. Create a new stack and paste this in:
---
version: "2"
services:
  dokuwiki:
    image: linuxserver/dokuwiki
    labels:
      - traefik.enable=true
      - traefik.http.routers.dokuwiki.rule=Host(`wiki.yourdomain.com`)
      - traefik.http.routers.dokuwiki.entrypoints=web
    container_name: dokuwiki
    environment:
      - PUID=998
      - PGID=100
      - TZ=America/Denver
    volumes:
      - /srv/dev-disk-by-label-Files/Config/Dokuwiki:/config
    restart: unless-stopped
Be sure to change the “volumes” to reflect YOUR server’s storage settings.
Click Deploy and wait for it to deploy. You should now be able to go to https://wiki.yourdomain.com and access your DokuWiki server. If you can’t, be sure to check the container’s Network settings and make sure it’s on the “web” network.
Automating CloudFlare IP/DNS Updates
There’s a chance that your ISP will change your IP address from time to time. To automate the process of updating CloudFlare, we’re going to create another container.
Go to your CloudFlare account and click the icon in the top right with the little man’s head in it. Then click “My Profile”.
Click the API Tokens tab. Then click the blue “Create Token” button. Enter a “Token name”. It can be whatever you want it to be. It’ just so YOU know what it’s for.
Next, setup the permissions like this:
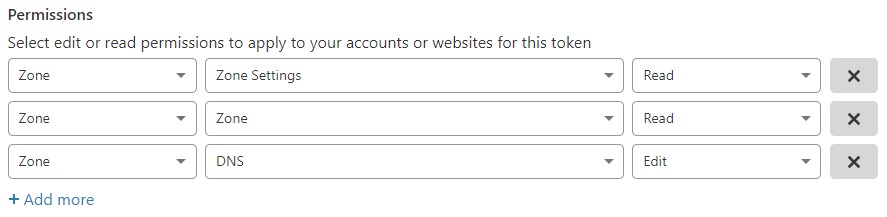
Click the blue “Continue to summary” button. Verify the information and then click the blue “Create Token” button. Make note of the API Key it gives you. You’re going to use it in a second.
Next, go to your Portainer page and go to Stacks. Create a new stack and paste this in:
version: '2'
services:
  cloudflare-ddns:
    image: oznu/cloudflare-ddns:latest
    restart: always
    environment:
      - API_KEY=YoUr-ClOuDfLaRe-ApI-kEy-GoEs-HeRe
      - ZONE=yourdomain.com
      - SUBDOMAIN=monitor
      - PROXIED=true
That’s it. Now you’ve setup Traefik on your server and have setup 1 domain with 3 subdomains to point to different containers on your server. And it’s all secured with a CloudFlare SSL and IP obfuscation.