In this post we’ll take a look at How to Install RDesktop in OpenMediaVault and Docker!
The process is really fast and easy. We’ll do everything in stacks, but before we do that, there’s some setup we need to do first.
You’ll want to make sure that you’ve got a shared folder on your OpenMediaVault server for your different containers’ configuration files and folders. Make note of the Absolute Path of that folder as you’ll need that later.
Install RDesktop
First things, first. You’ll need to login to Portainer and open a new Stack.
Next, paste the following in:
---
version: "2"
services:
  rdesktop:
    image: linuxserver/rdesktop
    container_name: rdesktop
    privileged: true #optional
    environment:
      - PUID=998
      - PGID=100
      - TZ=America/Denver
    volumes:
      - /var/run/docker.sock:/var/run/docker.sock #optional
      - /srv/dev-disk-by-label-Files/Config/RDesktop:/config #optional
    ports:
      - 3389:3389
    shm_size: "2gb" #optional \
    restart: unless-stopped
You’ll only need to change the PUID, GUID, TZ, and the second volume option. You can find the PUID and GUID by opening Putty and logging into your server. Then type in:
id admin
Make sure to replace “admin” with your Portainer username.
Make not of the values that are returned. It should look something like this:

Next, change the TZ (that’s Time Zone) to YOUR timezone.
In the volumes, you’ll change the path to be the Absolute path to your shared configuration folder. You can find the absolute path by going to the “Shared Folders” in your OMV dashboard.

You’ll then append that with the name of the application. In the end, it should looks something like the schema shown above.
The “shm_size” should be AT LEAST 1gb, but you can increase that if you want to. Just don’t take too much away from your server. 1-2gb should be adequate.
Once you’ve got all that entered, press the blue “deploy container” button and wait a few minutes for it to setup.
One last thing, be sure to change the network the container uses to “host” or it won’t work the way we want it to.
Logging In to RDesktop
Once the container has deployed, open up the Windows Remote Desktop program on your main PC. Enter the IP address of your server and press “Connect”.
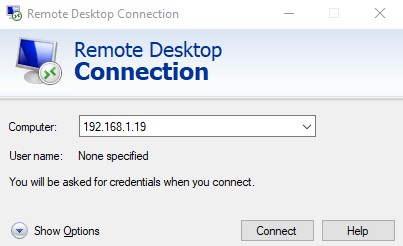
The first time you connect, a screen will pop up making sure you know that you’re connecting to a new server. I always check the box to tell it NOT to notify me every time. Then click OK.
Your new RDesktop environment should load. Feel free to use it like any other Linux desktop. Make sure to open a terminal window and run these 2 commands:
sudo apt update
and
sudo apt upgrade
Doing this will update your desktop with all the needed security patches and whatnot.
That’s it! You should have a desktop environment setup and running on your OpenMediaVault server now!
Additional Reading
Here are some other projects that you can do with your OpenMediaVault setup: https://dbtechreviews.com/category/openmediavault/