In this video we’ll look at how to Setup the Ultimate Raspberry Pi 4 Home Server with DockSTARTer.
The main goal of DockSTARTer is to make it quick and easy to get up and running with Docker.
You may choose to rely on DockSTARTer for various changes to your Docker system, or use DockSTARTer as a stepping stone and learn to do more advanced configurations.
You can learn more about DockSTARTer here.
Full list of native apps available in the sidebar here: https://dockstarter.com/
Because we’ve spent the past several months sort of ignoring Raspberry Pi users, we’re going to shift gears and setup a home server on a Raspberry Pi 4.
Getting started
First things first, you’re going to need a few supplies:
- A Raspberry Pi 4. I’m using the 4GB RAM model, but any of them should work.
- A Micro SD card. I’m using a 32GB card. The bigger the card, the better.
- An external hard drive. While this is technically optional, your Micro SD card will fill up fast if you start adding movies, music, TV shows, and that sort of thing.
note: those product links are Amazon affiliate links.
Once you’ve got everything ready, we can move over to our desktop and get started.
Installing Raspbian
Since we’re using a Raspberry Pi 4, we need an operating system to start from. We’ll use Raspbian Buster Lite, which you can download here.
When the download has completed, you’ll have a .zip file. Extract the .zip file.
Next, open a program like Balena Etcher.
Select the extracted image and the Micro SD card and click “Flash!”
When that’s done, eject the Micro SD card and insert it into your Raspberry Pi. Also, attach all the cables you need, but be sure to plug the power cable in last unless you have a switch on your power cable.
Also, I haven’t tested this with WiFi, so I don’t know if that will work. I advise using an ethernet cable for your network connection.
Once you have powered on your Raspberry Pi, it will go through a quick setup process and then will reboot.
After the reboot, we can get into setting things up.
Installing Up DockSTARTer
You can find the basic commands for DockSTARTer here, but there are a few additional things we’re going to do to customize our install.
First, find the IP of your Raspberry Pi. You may have to go to your router to get this information. Then, open PuTTY and connect to your Rasbperry Pi on port 22.
Your Raspian login credentials will be:
Username: pi
Password: raspberry
Next, you’re going to enter each of these commands, one after the other:
sudo apt-get update
sudo apt-get dist-upgrade
sudo apt-get install curl git
bash -c "$(curl -fsSL https://get.docker.com)"
bash -c "$(curl -fsSL https://get.dockstarter.com)"
sudo reboot
That’s the basic setup for DockSTARTer. You could, realistically run it right now and things would function as you’d want, but first, we need to mount our external hard drive.
Mounting the External Hard Drive
You’ll need to run the following command in PuTTY to find the exact path to your hard drive:
sudo fdisk -lYou should get something like this:
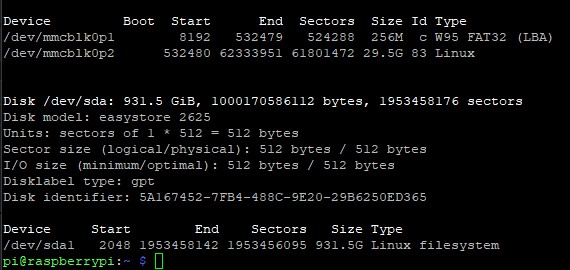
What we’re looking at is the attached storage information. The first device (at the top) is the Micro SD card. What we want is the other device at the bottom of the image. It will look like /dev/sda1.
Now that we have that, we can decide where to mount the hard drive. Because of the way DockSTARTer works, we’re going to mount it to /mnt/hdd.
So, type in the following:
cd ~
cd ..
cd ..
ls
You should see this:

Now you need to change directories to /mnt:
cd mntNext we need to create the hdd directory:
sudo mkdir hddWith that out of the way, we can actually mount the hard drive to the newly created hdd directory:
sudo mount /dev/sda1 /mnt/hddNext, you’ll want to make sure that your hard drive stays mounted even when you reboot, so we’ll have to add it to fstab.
But first we need to get some info about our drive. Type this into your SSH command:
blkidMake sure to copy the data into a notepad or similar for use in a moment.
Run the following command to edit the /etc/fstab file. Nano is a command line editor on Linux.
sudo nano /etc/fstabWe need to append one line of code at the end of the file. The format of this line of code is as follows:
UUID="uuid-of-your-drive" "mount-point" "file-system-type" "mount-option" "dump" "pass"Note that you need to separate these items with Tab key. For example, I added the following line to the end of /etc/fstab.
UUID=2ab36808-038a-4dfa-ad52-c10944cf61f2 /mnt/hdd ext4 defaults 0 2Setting Up DockSTARTer
Next we need to actually setup DockSTARTer. First thing we need to do is set the variables, so, in PuTTY, enter:
dsYou should see this screen:
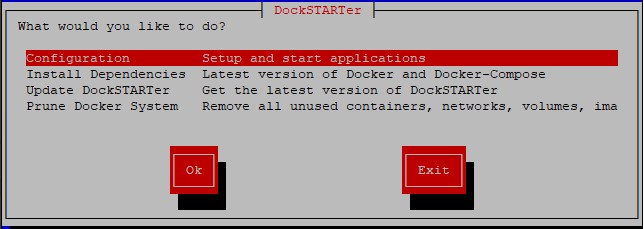
While on the “Configuration” option, click the Enter key on your keyboard.
On the next screen, select “Set Global Variables”.
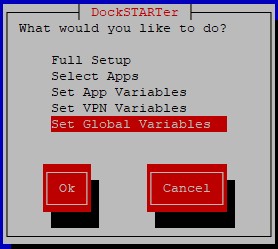
On the next screen, you’ll be asked if you want “to keep these settings for Global”. Select “No”.
You’ll be asked about your Time Zone, DOCKERHOSTNAME, PUID, and PGID. You can leave them all as they are.
Next you’ll be asked about the location for DOCKERCONFDIR. You can leave it as it is.
When asked about permissions for /home/pi/.config/appdata, say “Yes”.
Next we’re going to get into some questions about where to store other things like Downloads, Audiobooks, Books, Comics, Movies, Music, TV,
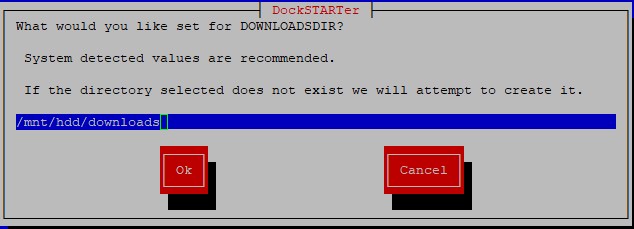
Select “Enter New” for each of these and add hdd/ to each of them after the /mnt/.
As an example, the Downloads folder looks like this by default:
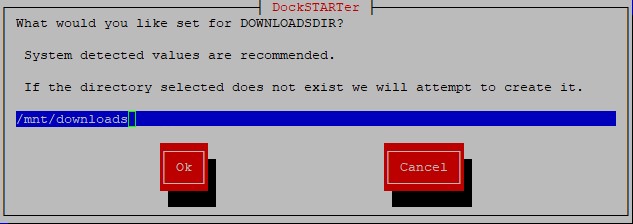
Change it to look like this:
And say “Yes” to setting permissions for each of those folders that you’ve changed:

Next, you’ll be asked about the DOCKERSHAREDDIR. You can “Keep Current”.
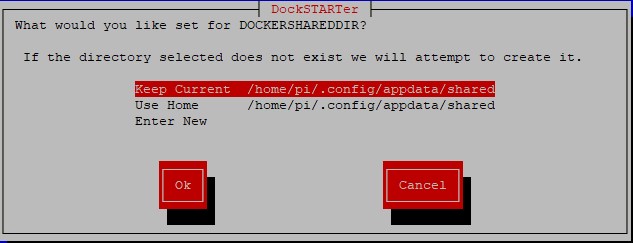
And set the permissions for that as well.
When asked if you would like to run compose now, you can say “Yes”.
Once that’s done, you want to get back to the main “ds” screen:

Select the first option and then select “Select Apps” and press Enter:
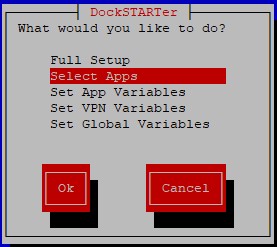
Then use the up and down arrows on your keyboard to navigate the list of available applications. Use the spacebar to make each selection. Once you’ve selected all the apps you want to install, press TAB on your keyboard to highlight the “Ok” button and press enter to continue.
You’ll be asked if you want “to run compose now”. Select Yes. The script will start the download and installation process of each of the apps your selected.
This may take quite a while so go grab something to eat and come back in a bit.
Checking Your Apps
Once the installation is complete, you can open a browser and go to http://your-server-address:9000 and create an admin account in Portainer and, from there, you can see all of your running containers and make any adjustments to them you’d like.
Adding and Deleting Apps
To add more apps, you can run the “ds” command in PuTTY at any time and select or remove any apps you’d like and repeat any of the steps you’ve already completed during the app installation process.
Conclusion
That’s it! Now you’ve got a fully functioning Raspberry Pi home server! You should now configure each of your apps to do what they need to do and you should be good to go. You can reach each app by going to http://your-server-address:xxxx (be sure to replace xxxx with the port number of the app).
OpenMediaVault Tutorials
If you’re interested in other tutorials for your home server, check here: https://dbtechreviews.com/category/openmediavault/
/=========================================/
Like what I do? Want to be generous and help support my channel?
Here are some ways to support:
Patreon: https://dbte.ch/patreon
Ko-fi: https://dbte.ch/kofi
/=========================================/
Remember to leave a like on this video and subscribe if you want to see more!
/=========================================/
Follow Me:
Twitter: https://dbte.ch/tw
Facebook: https://dbte.ch/fb
Subscribe: https://dbte.ch/ytsub

