In this video we’ll take a look at installing WordPress on Docker!
WordPress is open source software you can use to create a beautiful website, blog, or app.
In order to setup a WordPress container on your Docker server, you’ll need a few additional things:
- Domain Name – I use Porkbun, today’s video/blog post sponsor
- CloudFlare Account – You can use their free accounts for this
- NGINX Proxy Manager – Installation instructions here
Before we get into the Docker stuff, we need to setup a FREE CloudFlare account and purchase a domain (again, I use Porkbun). Once you’ve done both of those things, go into your CloudFlare account and Add A Domain.
You’ll be instructed to enter the URL you’d like to add. Do that and click next. Then select the FREE account option. CloudFlare will look for your domain’s existing DNS records if there are any.
Next, you’ll be asked to create some records. You want to create an A Record. Fill it out as shown in this image:

Replace the IP Address with your home’s IP Address. If you aren’t sure, you can go to Google and just type in “My IP” without quotes and it will tell you what your IP address is. Make sure to set the “Proxy status” to “DNS only” for the time being.
Once you’ve pointed the Name Servers, it may take an hour or two for the domain to actually point to CloudFlare. That’s just how domains work in this regard.
Once you’ve verified that your domain is pointed where you want, you can move forward with the next steps.
Copy the following into your Portainer Stack:
https://gist.github.com/dnburgess/8014dc2eae348c5d6219fd86adeb67cf
You’ll need to change the following for your server setup:
- Ports
- WORDPRESS_DB_USER (in the application AND database containers)
- WORDPRESS_DB_PASSWORD (in the application AND database containers)
- WORDPRESS_DB_NAME (in the application AND database containers)
- Volumes
Once you’ve done that, you can click “Deploy the Stack” and give the containers time to spin up.
When they’re done deploying you can go to http://your-server-address:8282 and you should see a WordPress install screen:

Once you reach this step, STOP.
NGINX Proxy Manager
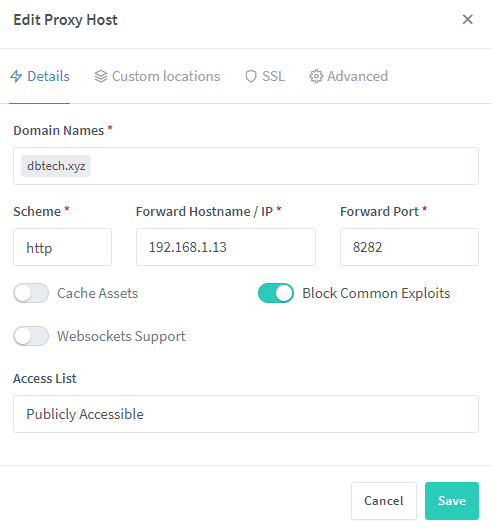
Now you need to go to your NGINX Proxy Manager dashboard. Click the “Add a Proxy Host” button and fill in the blanks:

Next, click the “SSL” tab. In the dropdown, select “Request a New SSL Certificate”, click the “Force SSL”, “HTTP/2 Support”, and “I accept” options and click “Save”.
After a few moments, the screen should refresh and your domain should be ready. Now you can click the URL in the Proxy Host list and the Install screen we saw earlier should be back up, but it should be on your secured domain name.
Fill in the fields on the install screen and click continue. You’ll see a screen saying that everything is good to go and advising you to login with the account you just created.
Once you login, you will want to run any updates that may need to be run and then install a couple of plugins.
The most important plugin to install is called “SSL Insecure Content Fixer“. This will help prevent any SSL redirect issues.
From there, the sky is the limit. You can install any plugins, themes, or whatever you’d like on your new, self-hosted WordPress site!

