In this post we’ll look at How to Install MotionEye on OMV and Docker
motionEye is a web frontend for the motion daemon, written in Python.
MotionEye Installation
Installing MotionEye in Docker for local access is very straightforward when using Stacks.
Open Portainer and create a new Stack and then paste the following in:
---
version: "2"
services:
  motioneye:
    image: ccrisan/motioneye:master-amd64
    container_name: motioneye
    volumes:
      - /etc/localtime:/etc/localtime:ro #Timezone Config / Do Not Change
      - /etc/motioneye:/etc/motioneye #Config Storage
      - /var/lib/motioneye:/var/lib/motioneye  #File Storage
    ports:
      - 8765:8765
    restart: always
You’ll notice some notes in the “volumes” section that explains what each volume does. You don’t need to change the localtime line, but you’ll want to map the Config and File Storage volumes to your system’s correct locations.
This is available for desktop and ARM processors. If you want to install this on an ARM processor device, be sure to change the image to:
ccrisan/motioneye:master-armhfOnce you’ve got that, you can click the “Deploy the Container” button and wait for the container to deploy.
After it has deployed, you can go to http://your-server-address:8765 to login.
The default credentials are:
Username: admin
password:
You’ll notice that there is no password. Just enter the username “admin” and click the login button.
NOTE: Be sure to change the password for the 2 user accounts that are setup by default.
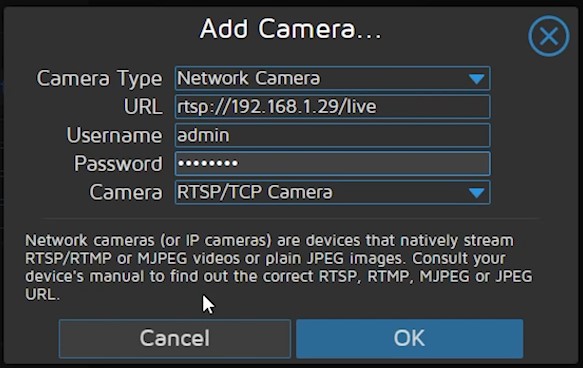
Once you’re logged in, you can then add a camera by clicking the hamburger menu in the top left and then clicking the dropdown that appears.
To add a Real Time Streaming Protocol (RTSP) camera, you’ll need to know the RTSP address for each camera.
In this demonstration I use a Wyze camera with a custom firmware that allows for RTSP.
The address that is given by Wyze for RTSP access looks like this:
rtsp://admin:[email protected]/liveSo we’re going to enter the information into MotionEye like this:

After you have entered everything you should be able to connect to the camera and adjust the settings for things like resolution and Frames Per Second (FPS).
You can repeat the process of adding more cameras for each of the cameras you want to add to the system.
Outside Access
If you’d like to make your cameras accessible from wherever you are, you can attach your container to Traefik by making your Stack look like this:
---
version: "2"
services:
  motioneye:
    image: ccrisan/motioneye:master-amd64
    labels:
      - traefik.enable=true
      - traefik.http.routers.cams.rule=Host(`cams.dbtechdemo.com`)
      - traefik.http.routers.cams.entrypoints=web
      - traefik.http.services.cams.loadbalancer.server.port=8765
    container_name: motioneye
    volumes:
      - /etc/localtime:/etc/localtime:ro #Timezone Config / Do Not Change
      - /etc/motioneye:/etc/motioneye #Config Storage
      - /var/lib/motioneye:/var/lib/motioneye  #File Storage
    ports:
      - 8765:8765
    restart: always
Of course, you’ll need to change the URL from cams.dbtechdemo.com to whatever URL you’d like to use to access your cameras.
You can also add the 4 labels to your container later if you like by editing the container and creating 4 new labels.
Also, be sure to change the network from “motioneye_web” to “web”.
Once you’ve done that, you can go to whatever URL you setup and attached to your Traefik setup and login with the credentials you created in MotionEye.
Other OpenMediaVault Tutorials
If you’re interested in other tutorials for your home server, check here: https://dbtechreviews.com/category/openmediavault/
/=========================================/
Like what I do? Want to be generous and help support my channel?
Here are some ways to support:
Patreon: https://dbte.ch/patreon
Ko-fi: https://dbte.ch/kofi
/=========================================/
Remember to leave a like on this video and subscribe if you want to see more!
/=========================================/
Follow Me:
Twitter: https://dbte.ch/tw
Facebook: https://dbte.ch/fb
Subscribe: https://dbte.ch/ytsub

